Troubleshooting: Microphone not detected
If you get a message that this program cannot detect a microphone on your system, check the following:
- Is your microphone plugged in and properly connected? Make sure that both ends of the cable between your microphone and your computer are securely connected to the correct locations.
- Is your microphone turned on and unmuted? If your microphone has a power button, make sure it is on. If it has a mute button, make sure it is off. If it has a volume control, make sure it is set at a reasonable level.
- Is your microphone enabled? If it isn't, or if you aren't sure, follow the appropriate instructions for your operating system below.
Enabling a microphone on Windows 8
Enabling a microphone on Windows 7
Enabling a microphone on Windows Vista
Enabling a microphone on Windows XP
Enabling a microphone on Mac OS 10.10, 10.9, or 10.8
Enabling a microphone on Mac OS 10.7 or 10.6
Enabling a microphone on Chrome OS on a Chromebook
Note: On tablets, the built-in microphone is automatically enabled, so you will not need to follow any of these instructions on iOS or Android.
Enabling a microphone on Windows 8
Windows 8 allows you to enable microphones through the Sound Control Panel.
To enable a disabled microphone on Windows 8:
- Navigate to the Start screen.
- Do one of the following to bring up the Search field:
- If you are using a mouse, point to the upper-right corner of the screen, move the mouse pointer down, then click Search.
- If you are using a touchscreen, swipe in from the right edge of the screen, then tap Search.
- Type Control Panel in the Search field, then select Control Panel in the list of results which appears.
- If you see the Sound option on the Control Panel, select it. If not, select Hardware and Sound, then select Sound.
- When the Sound Control Panel appears, click the Recording tab.
- On the Recording tab, look for the microphone you want to use in the list of recording devices. If you do not see it listed, right-click on an empty space in the panel and make sure that Show Disabled Devices is checked in the menu which appears.
- When you see the microphone you want to use, right-click on it. If it is disabled, select Enable in the menu which appears.
- After the microphone is enabled, select it and click Set Default to make it the default microphone for your system, if it is not already. This program may not detect your microphone unless it is the default device. The default microphone is marked with a checkmark in the list.
- If necessary, use the Properties option to adjust the recording volume. See Adjusting the OS recording volume for details.
- Click OK to close the Sound Control Panel.
Note: If your microphone does not appear even with Show Disabled Devices checked, there may be a problem with the microphone itself, or it may not be properly connected to your computer. Consult the microphone's documentation for set up instructions.
Note: If the microphone is already enabled but not working, click Configure on the Sound panel and follow the instructions on the screen to set it up and test it.
Enabling a microphone on Windows 7
Windows 7 allows you to enable microphones through the Sound Control Panel.
To enable a disabled microphone on Windows 7:
- Do one of the following to open the Recording section of the Sound Control Panel:
- Click on the Start button and choose Control Panel. If you see the Sound option, select it. If not, select Hardware and Sound, then select Sound. When the Sound Control Panel appears, click the Recording tab.
- Right-click on the volume icon in your taskbar and choose Recording devices from the menu which appears. The Sound Control Panel will open directly to the Recording tab.
- On the Recording tab, look for the microphone you want to use in the list of recording devices. If you do not see it listed, right-click on an empty space in the panel and make sure that Show Disabled Devices is checked in the menu which appears.
- When you see the microphone you want to use, right-click on it. If it is disabled, select Enable in the menu which appears.
- After the microphone is enabled, select it and click Set Default to make it the default microphone for your system, if it is not already. This program may not detect your microphone unless it is the default device. The default microphone is marked with a checkmark in the list.
- If necessary, use the Properties option to adjust the recording volume. See Adjusting the OS recording volume for details.
- Click OK to close the Sound Control Panel.
Note: If your microphone does not appear even with Show Disabled Devices checked, there may be a problem with the microphone itself, or it may not be properly connected to your computer. Consult the microphone's documentation for set up instructions.
Note: If the microphone is already enabled but not working, click Configure on the Sound panel and follow the instructions on the screen to set it up and test it.
Enabling a microphone on Windows Vista
Windows Vista allows you to enable microphones through the Sound Control Panel.
To enable a disabled microphone on Windows Vista:
- Choose Start / Control Panel (or Start / Settings / Control Panel, depending on how you have your Start menu configured).
- If you see the Sound option on the Control Panel, select it. If not, select Hardware and Sound, then select Sound.
- When the Sound Control Panel appears, click the Recording tab.
- On the Recording tab, look for the microphone you want to use in the list of recording devices. If you do not see it listed, right-click on an empty space in the panel and make sure that Show Disabled Devices is checked in the menu which appears.
- When you see the microphone you want to use, right-click on it. If it is disabled, select Enable in the menu which appears.
- After the microphone is enabled, select it and click Set Default to make it the default microphone for your system, if it is not already. This program may not detect your microphone unless it is the default device. The default microphone is marked with a checkmark in the list.
- If necessary, use the Properties option to adjust the recording volume. See Adjusting the OS recording volume for details.
- Click OK to close the Sound Control Panel.
Note: If your microphone does not appear even with Show Disabled Devices checked, there may be a problem with the microphone itself, or it may not be properly connected to your computer. Consult the microphone's documentation for set up instructions.
Note: If the microphone is already enabled but not working, click Configure on the Sound panel and follow the instructions on the screen to set it up and test it.
Enabling a microphone on Windows XP
Windows XP allows you to enable microphones through the Sounds and Audio Devices Properties panel.
To enable a disabled microphone on Windows XP:
- Choose Start / Control Panel or Start / Settings / Control Panel, depending on how you have your Start menu configured.
- If you see the Sounds and Audio Devices option, select it. If not, select Sounds, Speech, and Audio Devices, then select Sounds and Audio Devices.
- When the Sounds and Audio Devices Properties panel appears, click the Audio tab.
- In the Sound Recording section of the Audio tab, click on the Default Device field and select the microphone you want use. This program may not detect your microphone unless it is the default device.
- If necessary, use the Volume option to adjust the recording volume. See Adjusting the OS recording volume for details.
- Click OK to close the Sounds and Audio Devices Properties panel.
Note: If your microphone does not appear as an option for this field, there may be a problem with the microphone itself, or it may not be properly connected to your computer. Consult the microphone's documentation for set up instructions.
Enabling a microphone on Mac OS 10.10, 10.9, or 10.8
Mac OS 10.10, 10.9, and 10.8 allow you to enable microphones through the System Preferences.
To enable a disabled microphone on Mac OS 10.10, 10.9, or 10.8:
- Click the Apple menu in the upper left-hand corner of the screen, then select System Preferences.
- Click Sound.
- In the Sound window, click Input.
- In the Select a device for sound input box, select the microphone you want to use.
- If necessary, use the Input Volume slider to adjust the recording volume. See Adjusting the OS recording volume for details.
- Close the Sound Preferences when you are done.
Note: If your microphone does not appear as an option, there may be a problem with the microphone itself, or it may not be properly connected to your computer. Consult the microphone's documentation for set up instructions.
Enabling a microphone on Mac OS 10.7 or 10.6
Mac OS 10.7 and 10.6 allow you to enable microphones through the System Preferences.
To enable a disabled microphone on Mac OS 10.7 or 10.6:
- Click the Apple menu in the upper left-hand corner of the screen, then select System Preferences.
- Click Sound.
- In the Sound window, click Input.
- In the Select a device for sound input box, select the microphone you want to use.
- If necessary, use the Input Volume slider to adjust the recording volume. See Adjusting the OS recording volume for details.
- Close the Sound Preferences when you are done.
Note: If your microphone does not appear as an option, there may be a problem with the microphone itself, or it may not be properly connected to your computer. Consult the microphone's documentation for set up instructions.
Enabling a microphone on Chrome OS on a Chromebook
Chrome OS allows you to enable microphones through the Settings menu.
To enable a microphone on Chrome OS on a Chromebook:
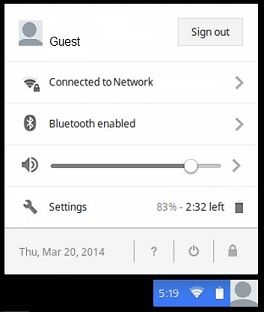
- Click in the lower right-hand corner of the screen to bring up the Settings menu.
- Click
 beside the
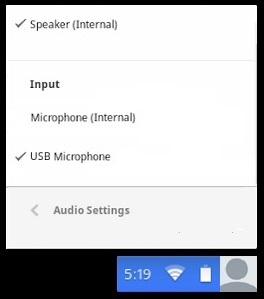
  slider. If this arrow does not appear, you have only the built-in microphone available, so you cannot enable a different one. If you do have more than one microphone, you will see the Input and Output settings.
 - Mark the checkbox beside the microphone you want to use.
- Click Audio Settings to return to the original settings menu, and make sure the volume is set appropriately. See Adjusting the OS recording volume for details.
- Click anywhere else on the screen to close the Settings menu when you are done.
If the program still cannot detect your microphone, contact our Technical Support.
- Troubleshooting: Recording problems
- Troubleshooting: No sound
- Troubleshooting: Lost server connection
- Setting up for recording
- Allowing the program to use your microphone
- Adjusting the OS recording volume
- Testing your system for speech analysis
- Testing your microphone volume
- Understanding and using EveryVoice™ speech analysis
- Recording in your browser on iOS
- Troubleshooting
- Getting technical support