Setting up for recording
When you open an activity that allows recording, the application will check whether your system is properly set up for it. You may see a series of screens during this process, which will vary based on your operating system, your browser, your activity, and your microphone settings. This topic gives instructions for each of the possible screens whose titles are listed below. You will not see all of these screens in one session, but you may see one or more of them, depending on your exact situation. Follow the instructions for whichever screens appear for you.
Recording in your browser on iOS
This activity would like to use your microphone.
We can't find a microphone.
Site wants to use your microphone / Would you like to share your microphone / Adobe Flash Player Settings (wording will vary by browser)
We'd like to check that your microphone is set up properly to use speech analysis.
Speak into the microphone.
Recording in your browser on iOS
If you are running this program on iOS, the first time each session that you open a recording activity, you will see a short tutorial about how to record in a browser in iOS. (A technical limitation of iOS prevents programs from making standard audio recordings in a web browser. On an iOS tablet such as an iPad, you must therefore record a video, from which this program will extract the audio.)
To use the tutorial, do any of the following:
- Tap the
 and
and  buttons or swipe from side to side go through all the screens of the tutorial.
 - Tap
 to close the tutorial.
 - Tap Skip activity to go to the next activity in the lesson, if there is one.
See Recording in your browser on iOS for information on how to make recordings.
This activity would like to use your microphone.
If you see a screen saying that the activity would like to use your microphone, do one of the following:
- Tap ENABLE to give the program permission to check your microphone and verify that it is configured correctly to record with this activity.
- Tap Skip activity to go to the next activity in the lesson instead, if there is one.
We can't find a microphone.
If you see a message that there is no microphone detected, do the following:
- Follow the instructions in Troubleshooting: Microphone not detected to make sure that your microphone is turned on, unmuted, connected to your computer, and properly enabled, then check the microphone again. In Internet Explorer or Safari, you can do so by clicking RETRY. In Chrome or Firefox, you must refresh the page to check the microphone again.
- Click Don't use recording features to use the activity in manual mode, meaning that you must click on answers rather than record them. This option only appears for activities that allow recording but do not require it.
- Click Skip activity to go to the next activity in the lesson instead, if there is one.
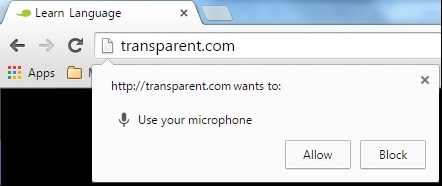
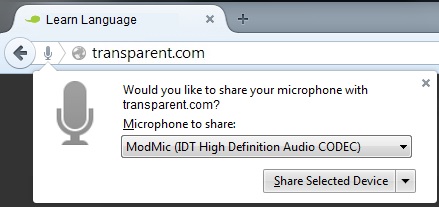
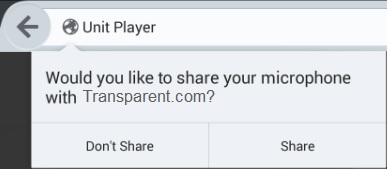
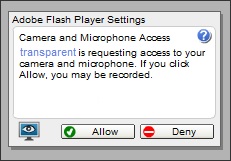
Site wants to use your microphone / Would you like to share your microphone / Adobe Flash Player Settings
In certain browsers on certain devices, you may see a message that our website wants to use your microphone, and asking whether you want to allow it. If you see this message, follow the appropriate instructions below.
- In Google Chrome on desktop or laptop computers (including Chromebooks), click the Allow button in the popup message near the top of the browser window. (If you click Deny, you will not be able to record with the activity.) If you don't see the popup, see Allowing the program to use your microphone for a possible solution.
- In Google Chrome on Android tablets, tap the ALLOW button in the popup message at the bottom of the browser window. (If you tap DENY, you will not be able to record with the activity.)
- In Firefox on desktop or laptop computers, you will see a popup window near the top of the browser asking if you would like to share your microphone with the website. Make sure that the correct microphone is selected in the Microphone to share field, then click Share Selected Device.
- In Firefox on Android tablets, you will see a popup window near the top of the browser asking if you would like to share your microphone with the website. Tap Share on that message. (If you tap Don't Share, you will not be able to record with the activity.)
- In Internet Explorer or Safari, click the Allow button on the Adobe Flash Player Settings message stating that the website is requesting access to your microphone. (If you click Deny, you will not be able to record with the activity.) If you don't see the message, see Allowing the program to use your microphone for a possible solution.

We'd like to check that your microphone is set up properly to use speech analysis.
If you see a screen asking you to test whether your system is properly set up for speech analysis, do the following:
- Click RECORD or press Ctrl/Cmd+R and speak the words "Testing 1, 2, 3" into your microphone, then click STOP or press Ctrl/Cmd+R again.
- If the recording is clear and the volume is appropriate, the program will tell you that you are all set. Click PROCEED to start the activity.
- If your recording is not understood, do any or all of the following:
- Click RETRY and record your voice again, being sure to speak clearly and loudly (but not shouting). Alternatively, try moving to a quieter location or eliminating potential sources of background noise by closing doors, turning off noisy devices, and so on. You can also try adjusting the recording volume for your operating system. See Adjusting the OS recording volume for instructions.
- Click Don't use recording features to use the activity in manual mode, meaning that you must click on answers rather than record them. This option only appears for activities that allow recording but do not require it.
- Click Don't use speech analysis to use the activity without automatic analysis of your pronunciation. You will still be able to record and play back your pronunciation, but the program will not evaluate it for you. This option only appears for activities that require recording but have optional speech analysis features.
- Click Skip recording test to use the activity without testing your microphone.
See Testing your system for speech analysis for more information.
Speak into the microphone.
If you are opening an activity that allows recording but does not require detailed speech analysis, you may see a screen that asks you to check your microphone volume. Do the following:
- Speak into your microphone and watch the volume bar on the screen.
- If the bar consistently stays mostly in the green section, your microphone setting is fine for recording with this activity.
- If the bar regularly goes into the red sections, indicating that your recording is too loud or too soft, you may need to adjust the recording volume set by your operating system.
- When you are satisfied with your recording volume, click PROCEED.
See Testing your microphone volume for more information.
- Recording in your browser on iOS
- Allowing the program to use your microphone
- Adjusting the OS recording volume
- Testing your system for speech analysis
- Testing your microphone volume
- Understanding and using EveryVoice™ speech analysis
- Setting the sound volume
- Troubleshooting: Microphone not detected
- Troubleshooting: Recording problems
- Troubleshooting: No sound
- Troubleshooting: Lost server connection