Adjusting the OS recording volume
Under some circumstances, you may need to adjust the recording volume set for your OS in order to record properly with this program. Instructions for Windows 8, Windows 7, Windows Vista, Windows XP, Mac OS 10.10, 10.9, or 10.8, Mac OS 10.7 or 10.6, and Chrome OS are included below. If you are using a computer with a different operating system, see that system's documentation for instructions.
Note: If you are using a tablet, you will not be able to adjust the recording volume, but you can see Troubleshooting: Recording problems for other possible solutions.
Adjusting the OS recording volume on Windows 8
Windows 8 allows you to adjust the recording volume through the Sound Control Panel.
To adjust the recording volume on Windows 8:
- Navigate to the Start screen.
- Do one of the following to bring up the Search field:
- If you are using a mouse, point to the upper-right corner of the screen, move the mouse pointer down, then click Search.
- If you are using a touchscreen, swipe in from the right edge of the screen, then tap Search.
- Type Control Panel in the Search field, then select Control Panel in the list of results which appears.
- If you see the Sound option on the Control Panel, select it. If not, select Hardware and Sound, then select Sound.
- When the Sound Control Panel appears, click the Recording tab.
- Select your microphone by clicking on it once, then click Properties (located towards the bottom right of the window).
- In the Microphone Properties window, select the Levels tab.
- The Microphone slider shows your microphone's recording level. Slide it to the right to increase the recording level, or slide it to the left to decrease the recording level. Close the Microphone Properties window when you are done.
- Click OK to close the Sound Control Panel.
Adjusting the OS recording volume on Windows 7
Windows 7 allows you to adjust the recording volume through the Sound Control Panel.
To adjust the recording volume on Windows 7:
- Do one of the following to open the Recording section of the Sound Control Panel:
- Click on the Start button and choose Control Panel. If you see the Sound option, select it. If not, select Hardware and Sound, then select Sound. When the Sound Control Panel appears, click the Recording tab.
- Right-click on the volume icon in your taskbar and choose Recording devices from the menu which appears. The Sound Control Panel will open directly to the Recording tab.
- On the Recording tab, select your microphone by clicking on it once, then click Properties (located towards the bottom right of the window).
- In the Microphone Properties window, select the Levels tab.
- The Microphone slider shows your microphone's recording level. Slide it to the right to increase the recording level, or slide it to the left to decrease the recording level. Close the Microphone Properties window when you are done.
- Click OK to close the Sound Control Panel.
Adjusting the OS recording volume on Windows Vista
Windows Vista allows you to adjust the recording volume through the Sound Control Panel.
To adjust the recording volume on Windows Vista:
- Choose Start / Control Panel (or Start / Settings / Control Panel, depending on how you have your Start menu configured).
- If you see the Sound option on the Control Panel, select it. If not, select Hardware and Sound, then select Sound.
- When the Sound Control Panel appears, click the Recording tab.
- On the Recording tab, select your microphone by clicking on it once, then click Properties (located towards the bottom right of the window).
- In the Microphone Properties window, select the Levels tab.
- The Microphone slider shows your microphone's recording level. Slide it to the right to increase the recording level, or slide it to the left to decrease the recording level. Close the Microphone Properties window when you are done.
- Click OK to close the Sound Control Panel.
Adjusting the OS recording volume on Windows XP
Windows XP allows you to adjust the recording volume through the Sounds and Audio Devices Properties panel.
To adjust the recording volume on Windows XP:
- Choose Start / Control Panel (or Start / Settings / Control Panel, depending on how you have your Start menu configured).
- If you see the Sounds and Audio Devices option, select it. If not, select Sounds, Speech, and Audio Devices, then select Sounds and Audio Devices.
- When the Sounds and Audio Devices Properties panel appears, click the Audio tab.
- In the Sound Recording section, ensure that the microphone you want to use is set as the default device, then click Volume.
- In the Recording Control window that pops up, the Microphone slider shows your microphone's recording level. Slide it up to increase the recording level, or slide it down to decrease the recording level. Close the Recording Control window when you are done.
- Click OK to close the Sounds and Audio Devices Properties panel.
Adjusting the OS recording volume on Mac OS 10.10, 10.9, or 10.8
Mac OS 10.10, 10.9, and 10.8 allow you to adjust the recording volume through the Sound Preferences.
To adjust the recording volume on Mac OS 10.10, 10.9, or 10.8:
- Click the Apple menu in the upper left-hand corner of the screen, then select System Preferences.
- Click Sound.
- In the Sound window, click Input.
- Make sure you have the correct recording device selected.
- The Input Volume slider shows your microphone's recording level. Slide it to the right to increase the recording level, or slide it to the left to decrease the recording level.
- Check the Use ambient noise reduction checkbox to help minimize background noise.
- Close the Sound Preferences when you are done.
Adjusting the OS recording volume on Mac OS 10.7 or 10.6
Mac OS 10.7 and 10.6 allow you to adjust the recording volume through the Sound Preferences.
To adjust the recording volume on Mac OS 10.7 or 10.6:
- Click the Apple menu in the upper left-hand corner of the screen, then select System Preferences.
- Click on Sound.
- In the Sound window, click on Input.
- Make sure you have the correct recording device selected.
- The Input Volume slider shows your microphone's recording level. Slide it to the right to increase the recording level, or slide it to the left to decrease the recording level.
- Close the Sound Preferences when you are done.
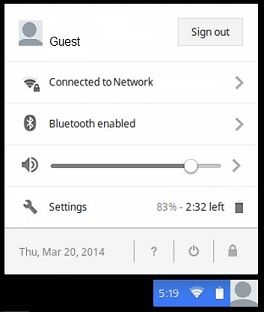
Adjusting the OS recording volume on Chrome OS on a Chromebook
Chromebooks do not allow you to adjust the recording volume separately. However, adjusting the volume of your speakers can affect the volume of your recordings as well.
To adjust the speaker and recording volume on a Chromebook:
- Click in the lower right-hand corner of the screen to bring up the Settings menu.
- If you have more than one microphone, click
 beside the
  slider and make sure you have the correct microphone selected, then click Audio Settings to return to the original settings menu.
- Slide the slider to the right to increase the volume, or slide it to the left to decrease the volume. You can also use the volume control keys on your keyboard.
- Click anywhere else on the screen to close the Settings menu when you are done.
If you continue to have issues recording, see Troubleshooting: Recording problems for other possible ideas.
- Setting up for recording
- Allowing the program to use your microphone
- Testing your system for speech analysis
- Testing your microphone volume
- Understanding and using EveryVoice™ speech analysis
- Recording in your browser on iOS
- Setting the sound volume
- Troubleshooting: No microphone detected
- Troubleshooting: Recording problems
- Troubleshooting: No sound